Categories
Alvosec

How to set most secure permissions for your website

In Linux, file permissions determine the levels of privilege for file owners and everyone else. It’s important to make sure any web-facing files have their permissions set correctly, so that a compromised process can’t write to places it shouldn’t.

Many articles will promote traditional way of setting permissions for your website, but from our experience that is the lowest level of security. We will explain non-traditional way of setting permissions, using ACL and isolating from other users.

First if you are hosting website on your server, you need to separate users from each other.

sudo adduser myuser –shell=/bin/false

sudo groupadd myuser

sudo usermod -g myuser myuser

Normally many authors will promote to set www-data as owner of all your websites. We recommend to have multiple users with their own groups and minimal rights.

Viewing the Permissions

The basic Linux permissions model works by associating each system file with an owner and a group and assigning permission access rights for three different classes of users:

  • The file owner.
  • The group members.
  • Others (everybody else).

File ownership can be changed using the chown and chgrp commands.

Three file permissions types apply to each class of users:

  • The read permission.
  • The write permission.
  • The execute permission.

This concept allows you to control which users can read the file, write to the file, or execute the file.

-rw-r–r– 12 linux users 12.0K Apr 25 11:10 file_name
|[-][-][-]- [——] [—]
| | | | | | |
| | | | | | +———–> 7. Group
| | | | | +——————-> 6. Owner
| | | | +————————–> 5. Alternate Access Method
| | | +—————————-> 4. Others Permissions
| | +——————————-> 3. Group Permissions
| +———————————-> 2. Owner Permissions
+————————————> 1. File Type

Let’s set the permission for our website:

chmod a+rwx,g-w,o-rwx website_folder

or:

chmod 750 website_folder

If you are more familiar to read permission in numbers then run:

stat -c “%a %n” *

Now that we set permission for our entry folder, we need to define ACL by using setfacl tool.

The setfacl utility sets ACLs (Access Control Lists) of files and directories. On the command line, a sequence of commands is followed by a sequence of files (which in turn can be followed by another sequence of commands, and so on).

setfacl -R -m u:www-data:rx /var/www/website_folder/

After that you can run getfacl to display ACL on directory.

For  each  file, getfacl displays the file name, owner, the group, and the Access Control List (ACL). If a directory has a default ACL, getfacl also displays the default ACL. Non-directories cannot have default ACLs.

getfacl website_folder/

This command will display as it follows:

# file: website_folder/
# owner: myuser
# group: myuser
user::rwx
user:www-data:r-x
group::r-x
mask::r-x
other::—

If you are running PHP-FPM pools then you may add in your pool profile:

listen.acl_users = www-data,myuser
listen.acl_groups = www-data,myuser

What we did so far is that we granted access only to our user and group to have rights to read, write and execute with exception that from all other users only www-data has right to read and execute.

Many users will not bother with this and they will simply go with permission 755, which gives right to all other users to read and execute, and that is the most dangerous way to set permission for your website.

Categories
Alvosec

How to set up secure cron job

How do I install or create or edit my own cron jobs?

To edit or create your own crontab file, type the following command at the UNIX / Linux shell prompt:

crontab -e

Do I have to restart cron after changing the crontable file?

No. Cron will examine the modification time on all crontabs and reload those which have changed. Thus cron need not be restarted whenever a crontab file is modified.

Syntax of crontab

* * * * * command to be executed
- - - - -
| | | | |
| | | | ----- Day of week (0 - 7) (Sunday=0 or 7)
| | | ------- Month (1 - 12)
| | --------- Day of month (1 - 31)
| ----------- Hour (0 - 23)
------------- Minute (0 - 59)

How to secure it?

Description:

The /etc/crontab file is used by cron to control its own jobs. The commands in this item make sure that root is the user and group owner of the file and that only the owner can access the file.

Audit:

Run the following command and verify Uid and Gid are both 0/root and Access does not grant permissions to group or other :

stat /etc/crontab

Remediation:

Run the following commands to set ownership and permissions on /etc/crontab :

chown root:root /etc/crontab
chmod og-rwx /etc/crontab

You can also set minimal permissions on cron.hourly, cron.daily, cron.weekly and cron.monthly.

Ensure cron is restricted to authorized users

First check if /etc/cron.deny and /etc/cron.allow exist on your system.

stat /etc/cron.deny
stat /etc/at.deny

If /etc/cron.deny exist you can delete it, and run following commands:

rm /etc/cron.deny
touch /etc/cron.allow
chown root:root /etc/cron.allow
chmod g-wx,o-rwx /etc/cron.allow

We prefer to go with whitelisting, so in that file cron.allow you can specify who is authorized to run cron jobs. If user is not whitelisted, he will be warned by system:

/etc/cron.allow: Permission denied
You (alvosec) are not allowed to use this program (crontab)
See crontab(1) for more information

Beside setting right permissions, never run sensitive information in cron job line, due to local attacks. Always run as a script, in example cron.sh.

Categories
Alvosec

10 steps to properly secure SSH server

SSH is a secure, encrypted replacement for common login services such as telnet, ftp, rlogin, rsh, and rcp . It is strongly recommended that sites abandon older clear-text login protocols and use SSH to prevent session hijacking and sniffing of sensitive data off the network.

Before you start with configuration of SSH, you need to generate keys as it is described here.

1. Ensure permissions are configured

stat /etc/ssh/sshd_config

Run the following commands to set ownership and permissions on /etc/ssh/sshd_config:

chown root:root /etc/ssh/sshd_config

chmod og-rwx /etc/ssh/sshd_config

2. Ensure SSH LogLevel is appropriate

Description:

INFO level is the basic level that only records login activity of SSH users. In many situations, such as Incident Response, it is important to determine when a particular user was active on a system. The logout record can eliminate those users who disconnected, which helps narrow the field.

VERBOSE level specifies that login and logout activity as well as the key fingerprint for any SSH key used for login will be logged. This information is important for SSH key management, especially in legacy environments.

sshd -T | grep loglevel

Edit the /etc/ssh/sshd_config file to set the parameter as follows:

LogLevel VERBOSE

3. Ensure SSH X11 forwarding is disabled

Description:

The X11Forwarding parameter provides the ability to tunnel X11 traffic through the connection to enable remote graphic connections.

Edit the /etc/ssh/sshd_config file to set the parameter as follows:

X11Forwarding no

4. Ensure SSH MaxAuthTries is set to 4 or less

Description:

The MaxAuthTries parameter specifies the maximum number of authentication attempts permitted per connection. When the login failure count reaches half the number, error messages will be written to the syslog file detailing the login failure.

Edit the /etc/ssh/sshd_config file to set the parameter as follows:

MaxAuthTries 4

5. Ensure SSH root login is disabled

Description:

The PermitRootLogin parameter specifies if the root user can log in using ssh. The default is no.

Rationale:

Disallowing root logins over SSH requires system admins to authenticate using their own individual account, then escalating to root via sudo or su . This in turn limits opportunity for non-repudiation and provides a clear audit trail in the event of a security incident.

Edit the /etc/ssh/sshd_config file to set the parameter as follows:

PermitRootLogin no

6. Disable Empty Passwords

Description:

The PermitEmptyPasswords parameter specifies if the SSH server allows login to accounts with empty password strings.

Edit the /etc/ssh/sshd_config file to set the parameter as follows:

PermitEmptyPasswords no

7. Ensure SSH access is limited

Description:

There are several options available to limit which users and group can access the system via SSH. It is recommended that at least one of the following options be leveraged:

AllowUsers

The AllowUsers variable gives the system administrator the option of allowing specific users to ssh into the system. The list consists of space separated user names. Numeric user IDs are not recognized with this variable. If a system administrator wants to restrict user access further by only allowing the allowed users to log in from a particular host, the entry can be specified in the form of user@host.

AllowGroups

The AllowGroups variable gives the system administrator the option of allowing specific groups of users to ssh into the system. The list consists of space separated group names. Numeric group IDs are not recognized with this variable.

DenyUsers

The DenyUsers variable gives the system administrator the option of denying specific users to ssh into the system. The list consists of space separated user names. Numeric user IDs are not recognized with this variable. If a system administrator wants to restrict user access further by specifically denying a user’s access from a particular host, the entry can be specified in the form of user@host.

DenyGroups

The DenyGroups variable gives the system administrator the option of denying specific groups of users to ssh into the system. The list consists of space separated group names. Numeric group IDs are not recognized with this variable.

Edit the /etc/ssh/sshd_config file to set one or more of the parameter as follows:

AllowUsers
AllowGroups
DenyUsers
DenyGroups

8. Ensure SSH access is firewalled

We recommend to restrict SSH access to specific IP addresses by using firewall. More secure solution is, if firewall is separated as hardware in front of the server. If that’s not a case then you can use any firewall application.

If you use iptables then use as follows:

iptables -A INPUT -p tcp -s 12.34.56.78/16 –dport ssh -j ACCEPT
iptables -A INPUT -p tcp –dport ssh -j REJECT

Of if you use UFW:

sudo ufw allow from 123.123.123.123 to any port 22 proto tcp

9. Ensure SSH AllowTcpForwarding is disabled

Description:

SSH port forwarding is a mechanism in SSH for tunneling application ports from the client to the server, or servers to clients. It can be used for adding encryption to legacy applications, going through firewalls, and some system administrators and IT professionals use it for opening backdoors into the internal network from their home machines.

Edit the /etc/ssh/sshd_config file to set the parameter as follows:

AllowTcpForwarding no

10. Use only strong ciphers

Description:

This variable limits the ciphers that SSH can use during communication.

Rationale:

Weak ciphers that are used for authentication to the cryptographic module cannot be relied upon to provide confidentiality or integrity, and system data may be compromised.

Run the following command and verify that output does not contain any of the listed weak ciphers:

sshd -T | grep ciphers

Check if your SSH version contains any weak ciphers. If you want to define only strong ciphers you can modify /etc/ssh/sshd_config:

Ciphers chacha20-poly1305@openssh.com,aes256-gcm@openssh.com,aes128-
gcm@openssh.com,aes256-ctr,aes192-ctr,aes128-ctr

If you have any further questions please feel free to contact us or leave a comment on our Twitter page.

Categories
Alvosec

Infographic – Crypto scams and how to avoid them

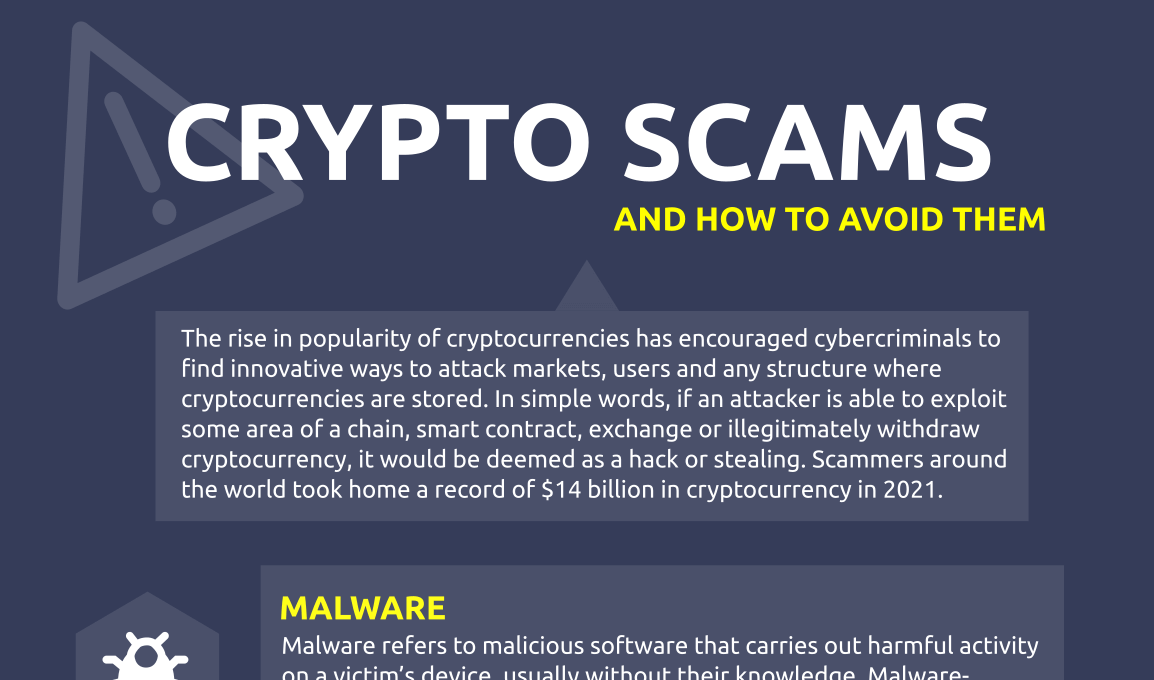
We are presenting new infographic, where most of the popular scams are explained using simple terms, so that any user can benefit from it. Please share with others, so that others will also be aware of scammers tactics.

Download infographic crypto-scams.pdf

Categories
Alvosec

Hackers steal $655K after picking MetaMask seed from iCloud backup

MetaMask, cryptocurrency wallet provider, has sent out a notification to its community warning them that they may be susceptible to ongoing phishing attacks if they make use of Apple iCloud.

The security issue for Mac, iPad, and iPhone users relates to the default device settings. These settings store and automatically backup the users’ app data if they opted for automatic backups on their devices.

MetaMask has warned its community that the MetaMask app data includes the user’s seed phrase for their wallets and that the seed phrase will be stored online with automatic backups–posing a serious threat to the security of the user’s cryptocurrency funds.

Real phishing case

Unfortunately, the scenario above was already used against at least one MetaMask user who has lost over $655k as a result of a well-crafted phishing attack.

https://twitter.com/Serpent/status/1515545806857990149

We at Alvosec always advise users to protect the entire environment where you deal with your cryptocurrency funds. If you are using backup then that backup must be properly secured, if you are using wallet on your PC then OS must be secured, if wallet is used on mobile device, then it must be protected.

How attack happened

From what we know, attacker spoofed caller ID, in order to gain higher level of trust and from there this individual unfortunately gave attackers OTP code, so that they were able to login in his iCloud.

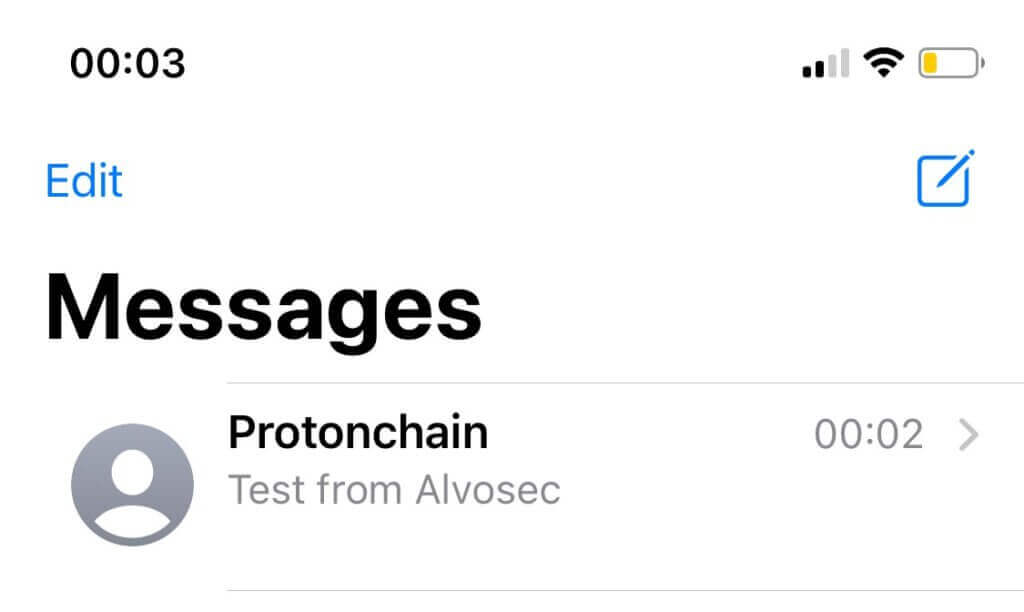
What we did, we tried to spoof ID to show users that it is possible to do that. Here is an example of it:

How to protect yourself — 5 tips

  • Double-check callers’ phone numbers, but keep in mind that caller IDs can be spoofed. Besides, remember that Apple will most likely not call you.
  • Never share any verification code with anyone.
  • Use a cold wallet to store your crypto assets to avoid phishing scams.
  • Disable iCloud backups for your MetaMask data via Settings > Profile > iCloud > Manage Storage > Backups. Also, turn off automatic iCloud backups via Settings > Apple ID/iCloud > iCloud > iCloud Backup.
  • Be smart with your personal information — scammers can use leaked information for phishing attempts.

Keep educating yourself by reading our blog.

Categories
Alvosec

Don’t feed the Phish!

As you all should know, nowadays phishing is a technique for attempting to acquire sensitive data, such as bank account numbers, crypto wallet details through a fraudulent solicitation in email or on a web site, in which the perpetrator masquerades as a legitimate business or reputable person.

In this article we will present 5 phishing techniques that you should be aware of it.

1. Beware of a look-alike domains

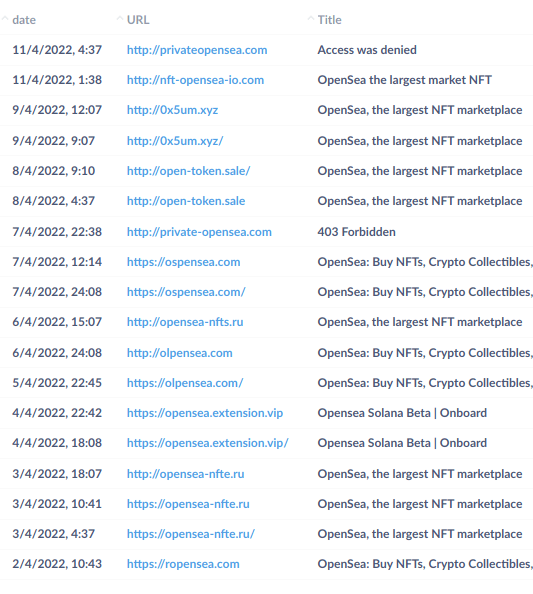
Attackers are trying to improve their tactics, so we may often see look-alike domains. Here are couple of examples that we spotted lately:

  • www.metamask.gr
  • www.trezor.us
  • bainance.info

2. E-mail spoofing attack

We wrote an explanation of how experienced crypto investor lost $1.7M in hot wallet hack. From that example it is obvious how important is to understand e-mail headers and not to fall into the trap of scammers.

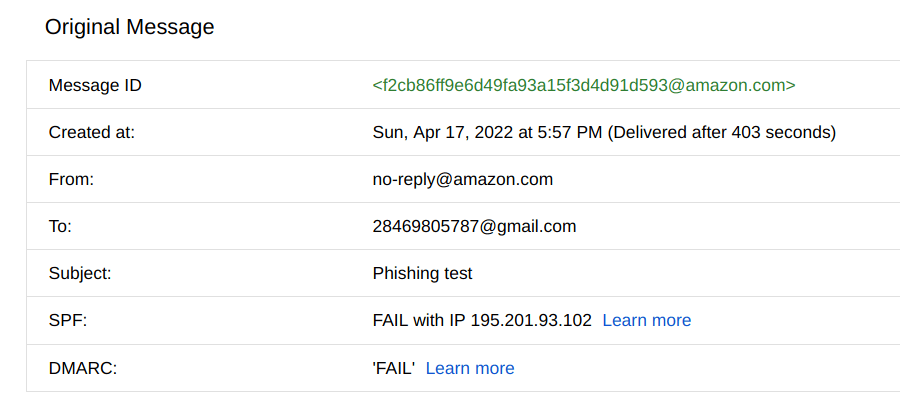
Here is an example of phishing e-mail that we generated in order to explain some details from email header. This is a classic e-mail spoofing attack:

So, as you may see we have sent an e-mail pretending to be “no-reply@amazon.com” by using our mail server. If you are using Gmail then by clicking on “show original“, Google will reveal some of the details, including mail security protocols.

Before we continue we need to explain what are those protocols SPF, DMARC and DKIM.

SPF, DKIM, and DMARC are the three main email security protocols that complement one another. Put simply, they are methods to authenticate a mail server and help prove to Internet Service Providers (ISPs), mail services, and other mail servers that senders are truly authorized to send an email.

SPF: Sender Policy Framework

Sender Policy Framework (SPF) works by strictly determining the number of allowed IP addresses that can send emails from your domain. Or in other words it is a DNS record containing information about servers allowed to send emails from a specific domain (for example, alvosec.com). 

DKIM: DomainKeys Identified Mail

DomainKeys Identified Mail (DKIM) authentication, on the other hand, makes sure that the content of the email is trusted and has not been compromised or tampered with during the delivery. Similar to SPF, the DKIM is added as a TXT record by adding it in the domain panel. 

DMARC: Domain-based Message Authentication, Reporting, and Conformance

Lastly, the Domain-based Message Authentication, Reporting, and Conformance (DMARC) is also referred to as “email signing.” It ties the first two email security protocols (the SPF and DKIM) together with a more consistent set of policies.

In our spoofing test above we see that SPF failed, due to non-whitelisted server of amazon.com. Whenever you see that SPF failed you must be careful with the message.

As it says in warning message, Gmail could not verify that it actually came from amazon.com.

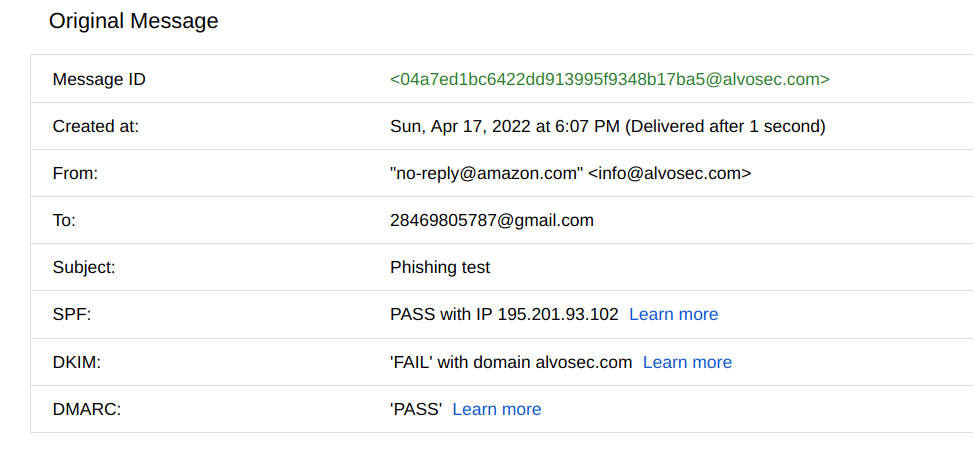
Here is a second example of spoofing, where we didn’t change an e-mail, but name of the sender which is under quotation marks. Some mail clients will show that as an actual sender, which may confuse users.

You can use this tool to analyze email headers.

3. Double check Google ads

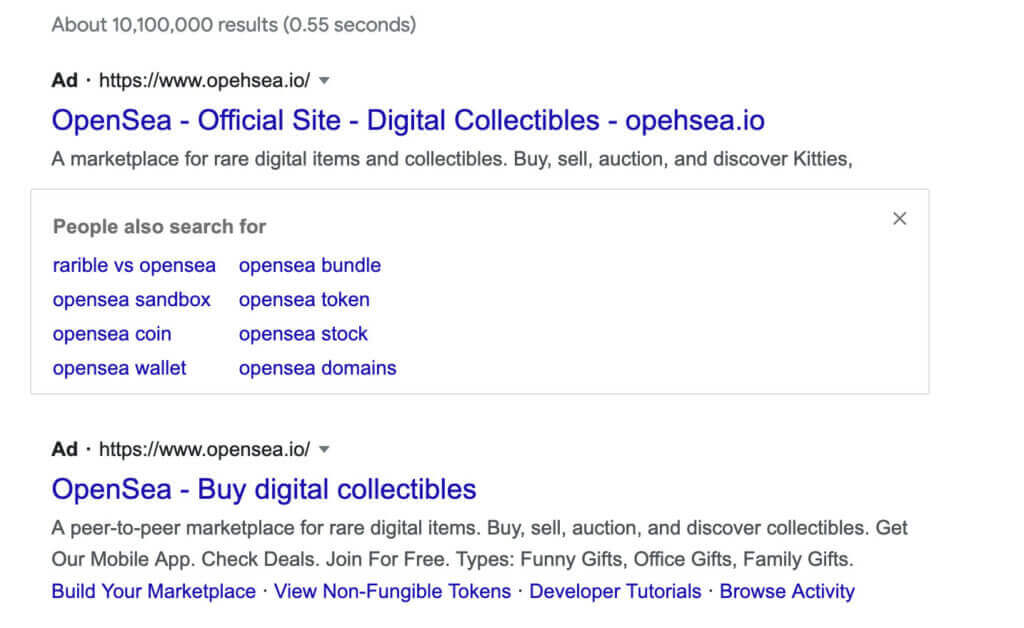
Scammers are placing ads at the top of Google Search that imitate popular wallet brands, such as MetaMask or any other website, to trick users into giving up their wallet passphrase and private key.

4. Beware of redirections and URL shorteners

When URL shorteners condense a link, the actual domain name of the site recipients will be directed to become obscured with random letters and numbers. There is nothing in those random figures to let the recipient know they’re clicking a malware link or being directed to a spoofing page where credentials can be stolen. While this would make some people hesitant to click, phishers knew the vast majority of people don’t know better, or can’t resist, so compromised shortened URLs began appearing in phishing emails and on social posts.

5. Social media spoofing attacks

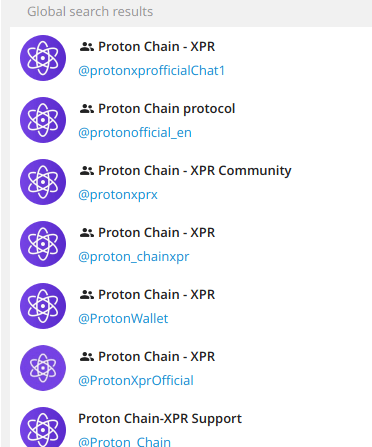
Attack of the clones: Beware of the fake social media accounts, where attackers are trying to clone either Telegram group, Facebook or Twitter page. You can read this article Investigation of websites and Telegram groups that are stealing private keys.

Here is an example of cloned Telegram groups pretending to be official support of Protonchain.