Categories
Alvosec

5 tips to enhance security for your XPR account

The rise in popularity of cryptocurrencies has encouraged cybercriminals to find innovative ways to attack markets, users and any structure where cryptocurrencies are stored. In simple words, if an attacker is able to exploit some area of a chain, smart contract, exchange or illegitimately withdraw cryptocurrency, it would be deemed as a hack or stealing. Scammers around the world took home a record $14 billion in cryptocurrency in 2021.

By gathering information we found that thousands of users were victims of cyberattack. There has been many reports where funds were stolen and never refunded back. We would like to encourage users to follow best security practice to avoid being victims.

1. Protect the device where cryptocurrencies are stored

Many users use their wallet on devices like PC or mobile phone, so if that’s your case we advise you to protect the device, by keeping everything up to date. An antivirus is essential because one, it keeps malicious software and other malware families away from your device. For Windows users we strongly advice to use Software Restriction Policies (SRP), Linux users should use either AppArmor or SELinux. We will definitely publish more articles about SRP, GPO and others.

Ensure that your environment is set by great security principle – POLP (Principle of Least Privilege). POLP principle means giving a user account or process only those privileges which are essential to perform its intended function.

If you are a Windows user then enable exploit protection. Exploit protection helps protect against malware that uses exploits to infect devices and spread. Exploit protection consists of many mitigations that can be applied to either the operating system or individual apps. More about Exploit protection read here.

For mobile users; always keep your device up-to-date, never download suspicious apps, email attachments and other unverified content. Keep your mobile authorization secure by setting Face ID or Touch ID or passcode.

2. Back up your private key

We have already publish an article where we explained how to back up your private key. How to back up your WebAuth private key?

You can also protect your wallet by taking your private key off the grid and keeping it in the ‘real world’. Simply writing down your private key on a piece of paper will work. Make sure you keep it in a dry place, protected from heat and direct sunlight, to avoid deterioration.

Be careful with your online activity and always check the link of the site you’re on if something feels strange. Internet scammers can clone entire websites and use almost identical URL addresses to the authentic ones. If you use an online wallet or a similar service where you are required to enter the private key, make sure to verify that the website address is the authentic one.

Keep in your mind that attackers can make a convincingly fake e-mail, almost identical as legit ones.

4. Never give away your private key

Private keys are for your eyes only. Do not share them with anyone and do not ask for somebody else to make transactions for you. Ignore all proposals or requests that involve you sharing your private key to a third party or person.

XPR team members will never email or DM you and ask for personal information or private keys!

5. Phishing attacks

The easiest way for hackers to access your wallet is via phishing attacks, where they trick you into entering your password or private key on the fake version of a real website.

Categories
Alvosec

How to back up your WebAuth private key? (advanced)

In this guide we will introduce you to private keys, their importance inside a cryptocurrency wallet and the reasons why you must back them up securely. Beside that we will also give you a practical example, where to safely store your private keys.

Owners of ‘user-controlled wallets’ like WebAuth sometimes lose their devices or fail to backup their recovery phrase in a safe place, thus losing their funds forever.

What is private key?

The role of a private key is to give anyone who knows the private key unrestricted access to the crypto assets. The private key by definition proves ownership of a crypto asset.

How to back up private key?

Important: Protonchain can’t recover your private key for you. If you lose it, you won’t be able to make any transactions with your wallet and they have no ability to assist on their end. 

Step 1: Tap on the settings icon which is on the far right.

Step 2: Tap on ‘Backup Wallet’.

Step 3: Type “I will never give my private key to anyone else” to proceed.

Step 4: Tap on the ‘Copy to pasteboard’ button to copy your private key.

Private key format will look like this:

PVT_K1_Udh6BnS…

Now that we have private key, we will encrypt file.

gpg –cipher-algo AES256 -c private_key.txt && gpgconf –reload gpg-agent

Choose secure password and enter it.

Verify password and content:

gpg -d private_key.txt.gpg

Important! The backup file can only be decrypted using your password.

GPG by default caches password, to clear cache just run:

gpgconf –reload gpg-agent

If you want, you can also use openssl to symmetricly encrypt file:

openssl aes-256-cbc -salt -pbkdf2 -in private_key.txt -out private_key.txt.enc

Now if you use cloud service, you have the ability to store an encrypted copy of your recovery private key on your personal cloud account. You will only have to remember a password, that you decide, in order to recover your funds.

Upload your file on your cloud service and store your encryption password separated from cloud. Either you can use password manager or other services.

Hardcore security

If you want to use even more advanced way of storing password, then you can use ssss – (Shamir’s Secret Sharing Scheme), a cryptography program to split a secret into n parts, requiring at least t parts to be recovered (with t <= n).

sudo apt install ssss

Then we have two options ssss-combine and ssss-split, in our case we will use ssss-split:

ssss-split -t 3 -n 3
Generating shares using a (3,3) scheme with dynamic security level.
Enter the secret, at most 128 ASCII characters:

Enter your password which you want to split in 3 parts. Output will look like this:

Generating shares using a (3,3) scheme with dynamic security level.
Enter the secret, at most 128 ASCII characters: Using a 160 bit security level.
1-e9df9b4fba7fa9ff09792526247d56d9d
2-5f1968dbcf9d25d58bf09bbe8437cb8bc
3-86caf1799b546be9e3213486ec945e9a4

Now let’s combine all 3 shares to recover our secret password:

ssss-combine -t 3
Enter 3 shares separated by newlines:
Share [1/3]: 1-e9df9b4fba7fa9ff09792526247d56d9d
Share [2/3]: 2-5f1968dbcf9d25d58bf09bbe8437cb8bc
Share [3/3]: 3-86caf1799b546be9e3213486ec945e9a4
Resulting secret: 561cPJbLWFwWOMxtEcpE

Three secret shares can be stored on three different locations, but remember that all of them are conditioned by each other in any order!

Categories
Alvosec

How to back up SSH keys?

Backup copies allow data to be restored from an earlier point in time to help the business recover from an unplanned event. Storing the copy of the data on separate medium is critical to protect against primary data loss or corruption.

Data backup should be an essential part of your computer/server usage routine. One of the most important aspects of IT security is data protection. Let’s take an example of how to simply back up some of the sensitive data – in our example SSH keys.

First of all, we need to back them up:

tar -cf ssh-keys.tar ~/.ssh/.alvosec

Then we will encrypt the file by using openssl:

openssl aes-256-cbc -salt -pbkdf2 -in ssh-keys.tar -out ssh-keys.tar.enc

Now we need to transfer that file into secure environment, where multiple layers of data protection exist. In our example we will transfer on Nextcloud application.

https://cloud.alvosec.com/

More about Nextcloud encryption model.

Having that file transferred, we need to store encryption password in secure environment. We recommend using BitWarden.

As your password manager, Bitwarden takes vault security seriously. This secure approach includes end-to-end encryption, administrative controls, and safety for client applications. Let’s take a closer look at each. More about their security model read here.

You are done, you have stored key and file on two separated locations, where data loss is less likely to happen.

Categories
Alvosec

How to create AppArmor profile for Nginx

AppArmor is a Mandatory Access Control (MAC) system which is a kernel (LSM) enhancement to confine programs to a limited set of resources. AppArmor’s security model is to bind access control attributes to programs rather than to users. AppArmor confinement is provided via profiles loaded into the kernel, typically on boot. AppArmor profiles can be in one of two modes: enforcement and complain. Profiles loaded in enforcement mode will result in enforcement of the policy defined in the profile as well as reporting policy violation attempts (either via syslog or auditd). Profiles in complain mode will not enforce policy but instead report policy violation attempts.

AppArmor profiles

AppArmor profiles are simple text files. Absolute paths as well as file globbing can be used when specifying file access. Most file access rules specify the type of access which is allowed: ‘r’ (read), ‘w’ (write), ‘m’ (memory map as executable), ‘k’ (file locking), ‘l’ (creation hard links), and ‘ix’ to execute another program with the new program inheriting policy. Other file access rules also exist such as ‘Px’ (execute under another profile, after cleaning the environment), ‘Cx’ (execute under a child profile, after cleaning the environment), and ‘Ux’ (execute unconfined, after cleaning the environment).

Source

Practical example of AppArmor profile

First you need to install AppArmor:

sudo apt install apparmor apparmor-utils apparmor-profiles

Check status of AppArmor:

systemctl status apparmor

In our example we will not use aa-easyprof, since that is less restricted than when creating a profile manually or with aa-genprof.

In our demonstration we will generate simple profile for Nginx.

Before that check the status of AppArmor profiles:

sudo apparmor_status

As you can see AppArmor operates in the following two types of profile modes:

Enforce – In the enforce mode, system begins enforcing the rules and report the violation attempts in syslog or auditd (only if auditd is installed) and operation will not be permitted.

Complain – In the complain mode, system doesn’t enforce any rules. It will only log the violation attempts.

Generate your first AppArmor profile

We will use program called aa-genprof in one terminal, and second terminal will be used to perform actions by using Nginx.

sudo aa-genprof /usr/sbin/nginx

Profiling: /usr/sbin/nginx

Please start the application to be profiled in
another window and exercise its functionality now.

Once completed, select the “Scan” option below in
order to scan the system logs for AppArmor events.

For each AppArmor event, you will be given the
opportunity to choose whether the access should be
allowed or denied.

[(S)can system log for AppArmor events] / (F)inish

Meanwhile in switch to second terminal where you will need to restart Nginx:

sudo service nginx restart

Now press S to scan and by doing that you will be prompted several times to allow or deny a capability. Go step by step and read every request. At the end you will be asked to save profile. You will need to perform couple more actions like stoping, starting, reloading of Nginx to bind access control attributes to selected program.

After you finish creating a profile you will need to check and maybe do more edits.

cd /etc/apparmor.d/

Open profile named usr.sbin.nginx:

# Last Modified: Thu Jan 20 23:53:33 2022
#include <tunables/global>

/usr/sbin/nginx {
 #include <abstractions/base>
 #include <abstractions/dovecot-common>
 #include <abstractions/nameservice>
 #include <abstractions/nis>
 #include <abstractions/openssl>
 #include <abstractions/postfix-common>

 capability dac_override,

 /usr/sbin/nginx mr,
 /var/log/nginx/access.log w,
 /var/log/nginx/error.log w,
 /var/www/html/* r,
 owner /etc/nginx/* r,
 owner /etc/nginx/conf.d/ r,
 owner /etc/nginx/modules-enabled/ r,
 owner /etc/nginx/sites-available/* r,
 owner /etc/nginx/sites-enabled/* r,
 owner /proc/sys/kernel/random/boot_id r,
 owner /run/nginx.pid rw,
 owner /usr/share/nginx/modules-available/* r,
}

Check if your website works:

curl localhost

Put your profile in complain mode until you are ready to change it to enforce mode:

sudo aa-complain /usr/sbin/nginx

Check status:

sudo aa-status

Reload AppArmor:

systemctl reload apparmor

For more information about AppArmor profiles visit Ubuntu website.

Categories
Alvosec

How to protect your server using SSH keys

Secure Socket Shell (SSH), also called Secure Shell, is a special network protocol leveraging public-key cryptography to enable authorized users to remotely access a computer or other device via access credentials called SSH keys. Because they are used to access sensitive resources and perform critical, highly privileged activities, it’s vital to properly manage SSH keys as you would other sensitive credentials.

While SSH keys are standard, and more frequently used, in Unix and Linux environments, they are also used in Windows systems.

Generating SSH Keys

Open your console and write:

ssh-keygen -t rsa -b 4096 -a 100 -f /home/debian/.ssh/<folder>/id_rsa

But before that you need to create folder to organize your keys inside .ssh folder. Just go in cd .ssh and mkdir .test folder and change permission to chmod 700 .test.

  • .ssh folder permission is 700 (drwx——)
  • public key permission is 644 (-rw-r–r–)
  • private key permission is 600 (-rw——-)

We are using keygen which is used as OpenSSH authentication key utility. Now let’s brake what we did:

-t dsa | ecdsa | ecdsa-sk | ed25519 | ed25519-sk | rsa
Specifies the type of key to create. The possible values are “dsa”, “ecdsa”, “ecdsa-sk”, “ed25519”, “ed25519-sk”, or “rsa”.

b bits
Specifies the number of bits in the key to create. For RSA keys, the minimum size is 1024 bits and the default is 3072 bits. Generally, 3072 bits is considered sufficient. DSA keys must be exactly 1024 bits as specified by FIPS 186-2. For ECDSA keys, the -b flag determines the key length by selecting from one of three elliptic curve sizes: 256, 384 or 521 bits. Attempting to use bit lengths other than these three values for ECDSA keys will fail. ECDSA-SK, Ed25519 and Ed25519-SK keys have a fixed length and the -b flag will be ignored.

-a rounds
When saving a private key, this option specifies the number of KDF (key derivation function) rounds used.  Higher numbers result in slower passphrase verification and increased resistance to brute-force password cracking (should the keys be stolen).  The default is 16 rounds.

-f filename
 Specifies the filename of the key file.

Next step is to copy your public SSH key to the server:

sudo ssh-copy-id -i ‘/home/debian/.ssh/.<folder>/id_rsa.pub’ user@127.0.0.1

After you successfully copied public key on your server, it’s time to try login with it.

ssh -i ‘/home/debian/.ssh/.<folder>/id_rsa’ user@127.0.0.1 -v

Verify if your key is in authorized keys:

cat ~/.ssh/authorized_keys

Disable Password Authentication Altogether

Open file sshd_config and scroll until you see the line that starts with “#PasswordAuthentication yes.” Remove the hash # from the start of the line, change the “yes” to “no”, and save the file. 

Don’t forget to also uncomment #PubkeyAuthentication, and change to true.

Restart the SSH daemon:

sudo systemctl restart sshd

Backup your SSH keys

Don’t forget to backup your SSH keys, as you might lose them. First you can backup them just by using tar:

tar -cf ssh-keys.tar ~/.ssh/.alvosec

After that you can also encrypt them by using symmetric encryption:

openssl aes-256-cbc -salt -pbkdf2 -in ssh-keys.tar -out ssh-keys.tar.enc

To decrypt them, run:

openssl aes-256-cbc -d -pbkdf2 -in ssh-keys.tar.enc -out ssh-keys.tar

Now you also need to backup your password for encrypted archive. : )


Categories
Alvosec

Malware targeting crypto wallets

SafeGuard Cyber detected a sample of the Echelon malware posted to a cryptocurrency discussion Telegram channel in October 2021.

Based on the malware and the manner in which it was posted, SafeGuard Cyber believes that is was not part of a coordinated campaign and was simply targeting new or naive users of the channel.

The sample of Echelon that we analyzed targets credentials, crypto wallets, and has some fingerprinting capabilities.

Background

In October 2021, SafeGuard Cyber detected a credential stealer piece of malware being posted in a cryptocurrency trading Telegram channel that we monitor as part of our work with financial service customers in the digital currency space. We analyzed and identified the malware sample as “Echelon” and reviewed the messages surrounding the post.

Analysis

The sample attempts to steal credentials from multiple different messaging, FTP, and VPN platforms, including:

  • Discord
  • Edge
  • OpenVPN
  • ProtonVPN
  • Outlook
  • Telegram

The sample attempts to steal the credentials/data for the following digital currency wallets:

  • Armory
  • Electrum
  • Monero
  • BitcoinCore
  • Exodus
  • Ethereum
  • LitecoinCore
  • Zcash

The first thing to note about this particular sample of Echelon is that it is obfuscated using “ConfuserEx v1.0.0”, making analysis of the code impossible without first de-obfuscating the code.

This sample of Echelon also contains anti-debugging methods. While attempting to step through the sample, the sample will always break at the same location when it runs a check using the RuntimeAssembly .Net library.

After de-obfuscating the assembly, it became easy to understand what techniques and types of data this Echelon sample was looking for. This sample uses the “%USERPROFILE%” variable to scrape the “AppData\Roaming”, “AppData\Local\Temp”, “AppData\Local” directories for user information. Specifically it looks to steal data from these files:

  • key3.db
  • key4.db
  • cookies.sqlite
  • login.json

It will then append all successfully scraped data to files such as “//Passwords_Mozilla.txt” or “// Cookies_Mozilla.txt”. Additionally, this sample contains large amounts of assembly regarding stealing the same data from the Gecko browser as well.

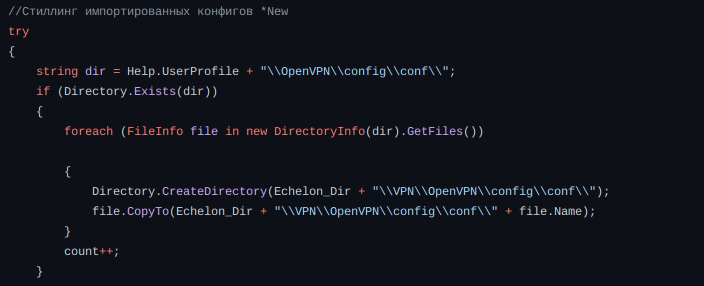
The sample also tries to steal profile of OpenVPN.

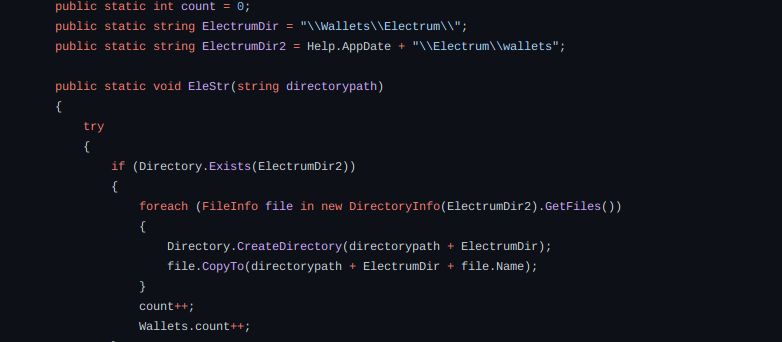
Here it will try to steal Electrum data.

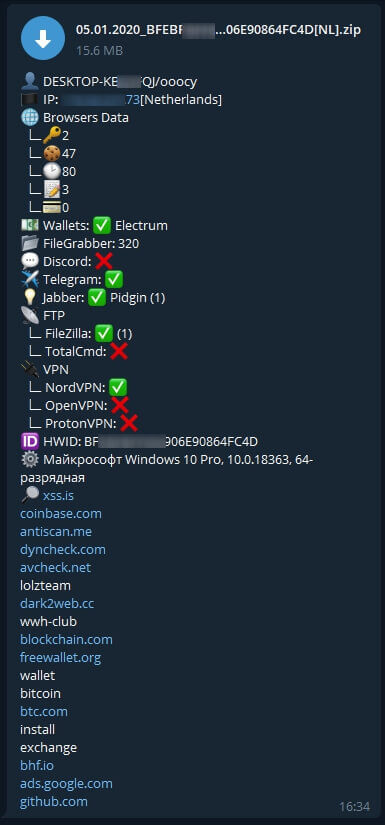
Stealer can communicate with Telegram Bot by sending all the victim logs.

Malware Original Name: Echelon.exe

IOCs

MD5: ad118a1292a5ebf2904fe718ad9e8558

Here you can check an analysis from Falcon Sandbox and VirusTotal.