Categories
Alvosec

What is a Security Policy?

The word “security” itself covers a vast range of concepts, tools and procedures, none of which apply universally. Choosing among them requires a precise idea of what your goals are. Securing a system starts with answering a few questions. Rushing headlong into implementing an arbitrary set of tools runs the risk of focusing on the wrong aspects of security. The very first thing to determine is therefore the goal. A good approach to help with that determination starts with the following questions:

The very first thing to determine is therefore the goal. A good approach to help with that determination starts with the following questions:

  • What are we trying to protect? The security policy will be different depending on whether we want to protect computers or data. In the latter case, we also need to know which data.
  • What are we trying to protect against? Is it leakage of confidential data? Accidental data loss? Revenue loss caused by disruption of service?
  • Also, who are we trying to protect against? Security measures will be quite different for guarding against a typo by a regular user of the system than they would be when protecting against a determined attacker group.

The term “risk” is customarily used to refer collectively to these three factors: what to protect, what needs to be prevented from happening, and who will try to make it happen. Modeling the risk requires answers to these three questions. From this risk model, a security policy can be constructed, and the policy can be implemented with concrete actions.

Bruce Schneier, a world expert in security matters (not only computer security) tries to counter one of security’s most important myths with a motto: “Security is a process, not a product”. Assets to be protected change in time, and so do threats and the means available to potential attackers. Even if a security policy has initially been perfectly designed and implemented, one should never rest on one’s laurels. The risk components evolve, and the response to that risk must evolve accordingly.

Extra constraints are also worth taking into account, as they can restrict the range of available policies. How far are we willing to go to secure a system? This question has a major impact on the policy to implement. The answer is too often only defined in terms of monetary costs, but the other elements should also be considered, such as the amount of inconvenience imposed on system users or performance degradation.

Once the risk has been modeled, one can start thinking about designing an actual security policy.

In most cases, the information system can be segmented in consistent and mostly independent subsets. Each subsystem will have its own requirements and constraints, and so the risk assessment and the design of the security policy should be undertaken separately for each. A good principle to keep in mind is that a short and well-defined perimeter is easier to defend than a long and winding frontier. The network organization should also be designed accordingly: the sensitive services should be concentrated on a small number of machines, and these machines should only be accessible via a minimal number of check-points; securing these check-points will be easier than securing all the sensitive machines against the entirety of the outside world. It is at this point that the usefulness of network filtering (including by firewalls) becomes apparent. This filtering can be implemented with dedicated hardware, but a possibly simpler and more flexible solution is to use a software firewall such as the one integrated in the Linux kernel.

Source: Debian Handbook by Raphaël Hertzog and Roland Mas
Categories
Alvosec

What is Steganography?

Steganography is the art of hiding a message. The purpose of steganography is to hide a message from a someone you don’t want to see it. It is different than cryptography, the art of secret writing, which is intended to make a message cannot be read , but does not hide the existence of the secret communication. Although steganography differs from cryptography, there are many analogies between the two, and some authors classify steganography as a form of cryptography since hidden communication is a type of secret writing. Steganography works by changing bits of useless or bot used data in regular computer files (such as graphics, sound, text, HTML) with bits of different, invisible information. This hidden information can be plain text, cipher text, or even images.

Practical example

Steghide is a command line utility that allows you to hide confidential data within various types of image and audio files.

For Linux users it can be installed with following command:

sudo apt-get install steghide -y

To start Steghide, the most basic option we use is the help command. This command will show us all the options that Steghide offers us.

Run the following command to pull the Steghide help section.

steghide –help

Embedding data in the image:

We hide the data in the image using the Steghide so that only the person who accepts it can read it. Therefore, we created a text file named “example.txt”, in which we wrote our confidential data and images. JPEG is the file in which we are embedding our data.

To achieve this, run the following command to embed “example.txt” in an image named “example.jpeg”.

steghide embed -ef example.txt -cf example.jpeg

Here, ef and cf are termed as embedded files and cover files, respectively.

Let’s see what this command is doing:

  • Steghide – Program Name
  • Embed – this is the command
  • -cf – This flag is for the cover file (the file used to embed the data)
  • filename – this is the name of the cover file
  • -ef – This flag is for the embed file (the file that will be embedded)
  • Filename – This is the name of the embedded file

You will be prompted to enter a passphrase. This passphrase will be necessary for anyone trying to extract data from the image. The passphrase is not required. However, anyone trying to extract data will be able to do so.

Extraction of data from image ny using Steghide:

Using Steghide adds an extra layer of security by allowing us to use a password for it. As long as you know the passphrase, it is quite easy to extract data from the image.

Now, use the following command to remove the hidden data:

steghide extract -sf example.jpeg

Categories
Alvosec

How to verify PGP signature of downloaded software

PGP (Pretty Good Privacy) is an encryption software that is mostly known for its use in email. It is used for encrypting, decrypting, and signing emails and files. Today we’ll focus on two of its most valuable features: verification and signing.

Why check PGP signatures?

Signing and verifying the signatures is important for data integrity. Verifying PGP signatures allows us to verify that the file or message came from a trusted source, since it has been signed with the author’s private key. The private key is something that only the author alone should have access to.  In order to verify it’s authentic, we would only need the signer’s public key.

How to use PGP to verify signature

In this article we’re going to verify the PGP fingerprint from Cryptomator. We’ll need three things: 

  1. .asc file, or PGP signature 
  2. The author’s verified public key
  3. software that we downloaded

First we will download software from Cryptomator.org. Once we downloaded software, we will import PGP public key:

gpg –import cryptomator.asc

You can verify fingerprint of imported public PGP key:

gpg –list-keys

You should see the fingerprint of key:

58117AFA1F85B3EEC154677D615…

Now we need to download PGP signature (digital signed software):

gpg –verify pgp-signature.asc cryptomator.appimage

If signature is ok, it should return:

Good signature from “Cryptobot”

Alternative solution: verify the sha256 checksum of a file

SHA256 checksum verification helps verify integrity of files you download. It helps identify if the downloaded file has been corrupted.

Open command prompt with administrator privileges. Navigate to the directory in which the downloaded file exists. Based on the OS you are using, execute the command mentioned.

LINUX

sha256sum cryptomator.appimage

WINDOWS

CMD

CertUtil -hashfile C:\file SHA256

POWERSHELL

Get-FileHash C:\file -Algorithm SHA256

MAC

shasum -a 256 /file

Categories
Alvosec

Symmetric and Asymmetric Encryption

Encryption is the process of encoding information so that only certain people can see it. To encrypt data, you use an encryption key. Similar to how a key is used to lock something, you use the encryption key to encode or lock plain text into encrypted text or ciphertext.

There are two main types of encryption:

  • symmetric
  • asymmetric

Symmetric encryption

In symmetric encryption, you use the same key for both encryption and decryption. The security of symmetric encryption relies heavily on keeping the key secret. Otherwise, anyone with access to the key can decrypt the ciphertext and see the information, which would defeat the purpose of encryption. Securely distributing the key is one of the primary challenges of symmetric encryption. Here is Alvosec application, that offers symmetric encryption.

Symmetric encryption has the advantage of being fast and simple. Common applications include:

  • Payment applications to prevent fraudulent charges and identity theft.
  • Random number generation or hashing.
  • Data at rest or stored data that is rarely in transit.

AES, DES, IDEA, and Blowfish are some standard symmetric encryption algorithms.

Asymmetric encryption

In asymmetric encryption (or Public-key cryptography), we use a key pair that consists of a public key and a private key. The public key is accessible to everyone, while the private key must be kept secret. There are two popular use cases:

  • Public key encryption:
    The information is encrypted using the public key and sent over to the recipient who has the corresponding private key. Only the recipient can see the information. Public key encryption helps to ensure confidentiality over the internet.
  • Digital signatures:
    The information is signed and encrypted using the private key. Anyone receiving the information can decrypt using the public key. Since only the sender has access to the private key, the decrypted information must be authentic and not tampered with.

Here you can read, how to create PGP keys to encrypt and sign files.

Asymmetric encryption is more secure than symmetric encryption and is widely used in HTTPS, email communications, and encrypted messaging.

Standard asymmetric encryption algorithms include RSA, DSA, Diffie-Hellman, and ECC.

Categories
Alvosec

What is the Principle of Least Privilege (POLP)?

The Principle of Least Privilege is the idea of providing the lowest level of access to all user accounts to reduce privileges to resources, systems, and networks. Only user accounts that require access to the specified resource are given access. Additionally, access is only given when it is needed, and then it is revoked. 

For example, if a specific user account exists to allow an employee to back up their data to a corporate server, they are only given privileges related to backing up their data. They are not given rights to install new apps and might not even be given access to view data, depending on the needs of the user.

While user accounts are typically in the spotlight when discussing the principle of least privilege, this philosophy also calls for running all applications with as few rights as possible. All applications will need some level of rights to operate, so they are given exactly the rights they need to operate and nothing further.

Cybercriminals are well aware that many enterprises use third-party applications and services that are integrated with internal systems. They study these third-party applications and their integrations to look for security flaws. Once found, they are exploited, and they may gain access to internal data. PoLP exists to restrict the level of access that third-party applications are given, greatly reducing this threat.

Benefits of the Principle of Least Privilege

  • Minimized attack surface: Hackers gained access to 70 million Target customer accounts through an HVAC contractor who had permission to upload executables. By failing to follow the principle of least privilege, Target had created a very broad attack surface.
  • Limited malware propagation: Malware that infects a system bolstered by the principle of least privilege is often contained to the small section where it entered first.
  • Better stability: Beyond security, the principle of least privilege also bolsters system stability by limiting the effects of changes to the zone in which they’re made.
  • Improved audit readiness: The scope of an audit can be reduced dramatically when the system being audited is built on the principle of least privilege. What’s more, many common regulations call for POLP implementation as a compliance requirement.
Categories
Alvosec

Ubuntu Pro – extended security

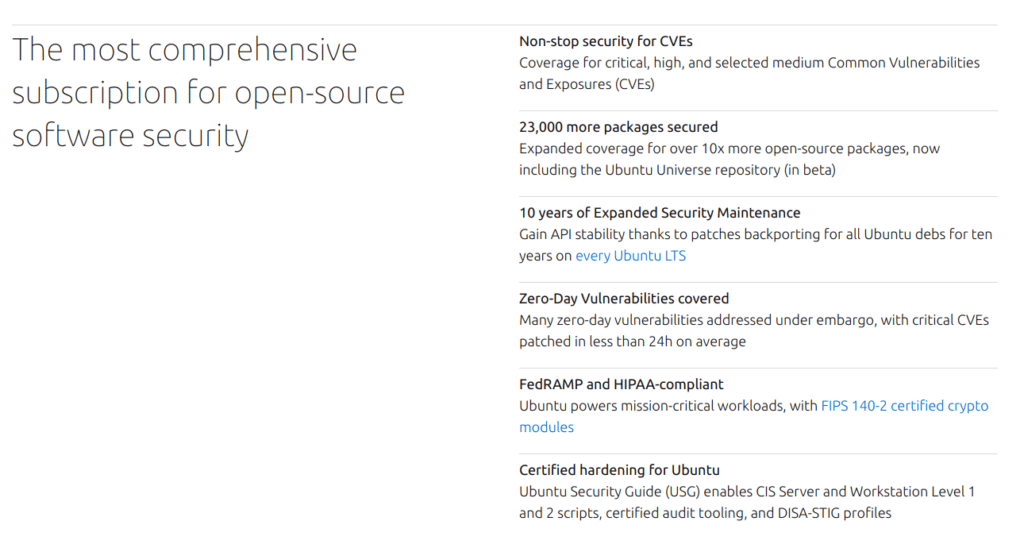
Attaching the Ubuntu Advantage subscription to Ubuntu, brings the enterprise lifecycle, including Linux kernel livepatching, access to FIPS validated packages, and compliance with security profiles such as CIS.

Installing the UA client

This step is necessary for Ubuntu Advantage customers or holders of personal subscriptions. If you are an Ubuntu Pro user, your subscription is already attached and you may skip these instructions.

We first need to make sure that we have the latest version of the UA client running:

sudo apt install ubuntu-advantage-tools

This will ensure that you are running the latest version of the UA client.

Attaching your subscription

Once you have checked that you are running the latest version of the UA client, you need to attach the UA token to your UA client to gain access to the Ubuntu Advantage services.

First we need to retrieve our UA token from our Ubuntu Advantage dashboard. To access your dashboard, you need an Ubuntu One account. If you still need to create one, ensure that you use the email address used to create your subscription.

Now we’re ready to attach our UA token to the UA client:

sudo ua attach <your token>

This machine is now attached to your account.

Note that Extended Security Maintenance and Livepatch will auto-enable once your token has been attached to your machine.